Monday, April 29, 2013

Honestly Love Every Second

Happy Monday!! Hope you all had a great weekend! My hubby and I went on our first date in probably a year this weekend! Long overdue! :) Other than that, we just hung around the house, did some yard work, totally relaxing!! I even made sure to get some crafty time in! 

I hope you're all not sick of my hybrid layouts!! :( I am so addicted to playing with digital elements right now!! There are soooo many great collections out there! About a month ago I found the Dear Lizzy Neapolitan kit at AC Digitals and I finally got to play around with it... 


I made the square pattern paper by making a whole bunch of individual squares and filling them with various papers that came in the collection. 


Of course I also had to use my "new" dies from My Creative Time. I think I use them on almost every project!! When I bought them, I really had no idea how much I would love them! I have a few more goodies from Emma's new release on their way to me, can't wait to play with them!! 

Here is what I used to make my layout...
- Dear Lizzy Neapolitan Digital Collection Pack from AC Digitals
- Button and Doily dies from My Creative Time
- Natural Hemp from Liz's Paperloft Boutique
- buttons and pearls from my stash
- foam stickers

Thanks for stopping by!!! 

Sunday, April 28, 2013

Florida Sunshine Layout

Happy Saturday everyone!! The sun is FINALLY starting to shine here, and the snow is almost gone!!! YAY!! This was the longest winter ever!!  I think it's time to start on some summer layouts!! 


I created this layout for the monthly sketchy challenge over at Canadian Scrapbooker Magazine. Last year I had a goal to get a project published, which I never really pushed myself to accomplish, but I think I am ready to start paying attention to publication calls! :) Someday, maybe. :) 

This is the sketch I followed...


I used a combination of two Peppermint Creative kits for this layout... 

and


I love taking digital embellishments and adding detail to them. I added a little Peachy Keen face to my sun and some coarse glitter and rhinestones to the flowers. 

I hope you enjoyed my layout today! I just wanted to take a quick minute to thank those of you who stop by my blog regularly!!! I haven't had as much time to leave comments on everyone's blogs lately, so I really appreciate the comments you leave here. :) Have a great Sunday!! 

Thursday, April 25, 2013

Hybrid Layout - Daughter

Hey everyone!! If you visit my blog often, you might know I have recently started doing a lot of hybrid projects, using digital scrapbooking kits. I have had a few questions about what exactly "hybrid" is, so I thought I would dedicate a post to answering that question! 

Hybrid crafting is using a combination of traditional paper and elements (buttons, glitter, etc.), with digital elements (pictures of pattern paper or elements that are computer files). Digital elements can be printed out, then cut by hand or a by using a machine such as the Silhouette. 


My favorite thing about creating using digital elements is the ability to lay my projects out on screen (in a program like Silhouette Software, or Photoshop) to see how they will turn out, before starting to assemble them. Changing the size and arrangement of elements means the possibilities with digital elements are really endless. I think my FAVORITE thing about digital kits, is that you can use the paper and elements over and over and over again! I tend to hoard my traditional paper and elements, and I know I'm not the only one!! (Right?! ;)) As FUN as playing with digital elements are... if you are like me, you NEED to get your hands in there!! Once all the digital elements are printed and cut out (I like printing on plain white, textured paper), traditional supplies like twine, pearls, glitter, buttons etc. can be added for extra depth and texture. 


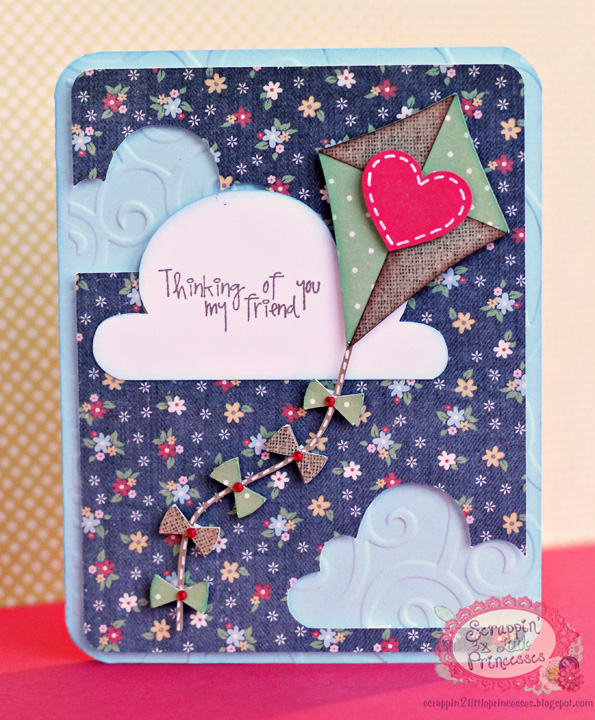
In my layout below, I started with my digital aspects... I started with a 12x12 square and filled it will my blue background paper. I could print the paper out at this point, but I knew I wanted to add doilies and other elements, which are really detailed and can be a little tricky to cut out. Instead, I made these elements part of my background paper. When I printed out my base sheet of my layout, I included my 12x12 blue base, doilies, a few strips of quatrefoil-ish pattern paper and two wood circle borders. Everything else you see on the page (flowers, tags, text) was printed/cut out individually, then added onto my page along with pictures and some pearls. 


To add some dimension, and to hide those ugly white edges that sometimes show after cutting elements out, I used fluid chalk ink (I like Colorbox) to ink the edges of my elements. (You can see the brown along the edges of my orange quote strips). I also use foam stickers to adhere some elements to add even more dimension. 


In the pic above, you can get a better view of how my base 12x12 sheet of paper was printed with the doilies and wooden borders right on it. 

For my layout I used the Uniquely You kit from Peppermint Creative (one of my favorite kits!!). 


How inspired are you just by looking at this kit?! The possibilities are endless!! 
I hope I answered some questions about hybrid scrapbooking!!! Prepare to be addicted!!! :) 

Wednesday, April 24, 2013

Pretty Paper, Pretty Ribbons - Kite Card

Hey Everyone!! I's Pretty Paper, Pretty Ribbons DT day I have another 'spring' card to share today!


I used the Kite and Clouds cutting files for my card...


Here is what I used to make my card...
- Kite and clouds cutting files from Pretty Paper, Pretty Ribbons
- Simple Stories 6x6 paper pad
- Swirls Cuttlebug embossing folder
- Colorbox Fluid Chalk Ink
- Sentiment from Pink By Design
- Recollections pearls from Michaels
- white gelly roll pen

Make sure to head over to the Pretty Paper, Pretty Ribbons blog to check out what the rest of the DT created!! 

Monday, April 22, 2013

Keep Calm and Drink Coffee Tutorial


I am in love with the new Life In Pictures releases from Peppermint Creative!! I am not that into Project Life (yet), but I love that the new Keep Calm Cards & Templates are versatile enough for anyone to use! The ‘Keep Calm and Drink Coffee’ sparked inspiration for a great gift idea! Who doesn’t LOVE a Starbucks gift card??
Keep Calm Coffee Silhouette1b

What I used to create my card:
Material

How I put it all together: 
Step 1: Use SVG file from Silhouette Store to cut out pieces for card (card base, lid, cup sleeve) in Silhouette Studio Software. 
Step 2: Print out Keep Calm Title Card on white cardstock then cut it out. 
NOTE: The color of the cards can easily be changed in a photo editing software such as Photoshop

Step 3: Ink around edges of Keep Calm Card with ink to give it a little dimension (and to cover white edges, if you’re picky like me! J) I also inked around the lid of the cup
Keep Calm Coffee Silhouette 2

Step 4: Add some detail to cup sleeve by drawing on some faux stitching using a white gelly roll pen and emboss the sleeve by using a Cuttlebug and embossing folder
Step 5: Turn the Keep Calm Card into a tag by using a hole punch to make a hole in the corner. Use twine to tie card onto cup sleeve (I used Trendy Twine!)
 
Keep Calm Coffee Silhouette=3

Step 6: Assemble card using adhesive and add a gift card inside
Keep Calm Coffee Silhouette SVG 2b

Love this idea but don’t have a Silhouette machine? Use it as a gift tag on a nicely wrapped mug filled with treats.
Keep Calm Coffee Gift 3

Let’s see how all the creative ways you use the Keep Calm Cards!
Make sure to add your pictures to the Peppermint Creative Gallery so we can be inspired!

Saturday, April 20, 2013

PPPR Spring Blog Hop!

This has been the longest winter ever... but TODAY you are in for some awesome SPRING projects! It's the Pretty Paper, Pretty Ribbons Spring Blog Hop and we are all using Lisa's awesome files!! If you just stumbled on this hop, make sure you go back to the Pretty Paper Pretty Ribbons blog so you don't miss anything! There are some great prizes up for grabs and awesome inspiration!! PLUS - Make sure you read this whole post since there is some great news at the end!!! 

I decided to get another Mother's Day card made, since it's going to sneak up on us before we know it! :)


I used Lisa's NEW Spring Garden Cutting Files for my card, as well as a new stack from DCWV, Sunday Afternoon. Such a pretty combo!  


I always use a ton of foam stickers to give my projects a lot of dimension. 

Here are the supplies I used in my project...
- Spring Garden Cutting files from Pretty Paper, Pretty Ribbons
- DCWV Sunday Afternoon stack
- Caribbean twine from The Twinery
- My Creative Time button and flag dies
- Pink By Design Our Mothers stamp set
- Colorbox Fluid Chalk Ink

How about some blog candy?! Lisa always puts together a great little package!! 


Here is what you have to do to win...
For a chance to win, you must be a follower of each blog on our hop and leave a comment on each blog.  For extra chances, you can also "LIKE" Pretty Paper, Pretty Ribbons on Facebook and/or sign up for the Pretty Paper, Pretty Ribbons Newsletter
A random winner will be chosen for the prize on Tuesday, April 23. Only US or Canadian mailing addresses, please.

And one more VERY important piece of information....


This is the biggest sale in the history of Pretty Paper, Pretty Ribbons and I'm assuming there will not be another sale this big any time soon. Happy shopping! :) 

Off to Jeanne's blog now!! 
If you get lost along the way, here is a complete list of the lineup...

Ana Maria ~ http://www.shortycreations.com/

Wednesday, April 17, 2013

New Winner!

Hi Everyone! I have yet to hear from the winner of the Heartstrings Designs February kit given away in the Little Prince Blog Hop from a couple weeks ago so I (random.org) choose a new winner! :) 

The new winner is...

Jean Bullock!!! 

Conrats Jean!!! :) I will be contacting you shortly! 

Thursday, April 11, 2013

Spring is in the Air

 Hey everyone!! I am loving playing with digital kits these days!! I love the fact that I can design projects on my laptop, from my couch, after a long day. My newest "adventure" is joining the Peppermint Creative Creative Team and I'm loving it. I am learning a whole different style of scrapping... I'm not sure that I am GOOD at it yet, but I'm learning and am confident I will get onto this new style in no time. :)

The layout I created today is for the newest challenge over at the Cameo Creations Challenge Blog. The theme of the new challenge is Spring, and use glitter in your project. 


I love printing out my own digital paper, but I love to add my own little details to it. In this case, I used some stickles to add some sparkle to the pink flowers on my background paper. 


I also tried something new... I added glossy accents to my title, then sprinkled some glitter over it before it dried. It looks kinda crappy in my pic because it wasn't dry yet, but I was losing daylight and had to get my layout photographed!! 


My favorite thing about using digital kits is that there are so many matching embellishments to choose from!! Once they are printed and cut out, it's so easy to add my own little details such as bling, glitter, etc. 


Here is what I used to make my project...
- Recollections rhinestones
- Stickles
- Buttercream twine from The Twinery
- glossy accents
- Martha Stewart glitter

Make sure you head on over to the Cameo Creations blog to link up your Spring projects using glitter for a chance to win a $10 GC to Lettering Delights!! 

Tuesday, April 9, 2013

You are Naturally Sweet - PPPR

Who's up for another Pretty Paper, Pretty Ribbons DT Day?!?! I hope you all love these days as much as I do! If you loved them before, you will REALLY love them now! Lisa has added three new girls to the design team and their projects are AWESOME!!! You really need to head on over to the Pretty Paper, Pretty Ribbons blog to check out these projects....

I played with the Honey Bees Cutting Files and Sunny Skies digital paper this week.


To create my card.... 
1. In Silhouette Studio I created four rectangles (all the same length but varied heights) and lined them up on top of each other
2. By dragging and dropping my digital pattern paper, I filled each rectangle with a different pattern (all from the Sunny Skies Collection)
3. I printed out the rectangle on textured paper and cut out the rectangle using a paper trimmer
4. Using my sewing machine, I added some zigzag stitches where my pattern paper matched up
5. I created an outline of my bear using the Offest button and filled it with a light grey pattern paper
6. Moving the dark yellow parts of my bear off to the side, and grouped the rest of the pieces of my bear (including the new offset layer) to print
7. Once pieces were printed/cut, I used Colorbox fluid chalk ink to ink around my dark yellow parts and the outline of the bear. A finishing touch was adding some glossy accents to the honeycomb on the bear's tummy.
8. I ran a strip of 3 Girl Jam ribbon across my background layer and added a bow
9. After putting my bear together, I added some foam stickers to the back and added it to the card
10. Added my sentiment stamp

Here are the supplies I used for my card...
- Pretty Paper, Pretty Ribbons Honey Bees Cutting Files & Sunny Skies Digital Paper

- sentiment from Love Stings - Jaded Blossom
- 3 Girl Jam crinkle ribbon
- glossy accents
- cardstock
- sewing machine
- Colorbox Fluid Chalk Ink
- White gelly roll pen

Thanks for stopping by today!!! :) 

Monday, April 8, 2013

Happy Bear-Day!

Hey friends!!! I have a card to share today, inspired by the second Peachy Keen release challenge! I LOVE these challenges!! Always so fun! 


I used my new Teddy Bear Face Assortment stamp set from Peachy Keen along with a cute little SVG from Miss Kate Cuttables. I have a feeling you'll be seeing a lot of teddy bears on my blog in the near future! These face stamps are just tooo cute!! 


Here is what I used to make this card...
- Teddy Bear from Miss Kate Cuttables
- Peachy Keen Teddy Bear face stamps (pink chalk for cheeks)
- Colorbox Fluid Chalk Ink
- digital paper from Designs by Dani
- doily and banner die from My Creative Time
- Sentiment from Pink by Design

Thanks for stopping by! Have a great day!! 

Sunday, April 7, 2013

Little Miss Sunshine

Happy Sunday! :) I have been on a layout run lately! My favorite thing to play with these days is a combination of digital kits and SVGs! 
I made this layout for one of the release challenges over at Peachy Keen... 


SO let me explain this layout a little.... Bria LOVES the mud. I cannot keep her out of it. (Thank goodness her little sister HATES to be dirty...) She calls summer,"The Season of Mud" and her favorite thing about summer is getting dirty. She is like a little piglet, happiest in the summertime where there is mud. :) 


And check out this adorable frog!!! I think I should have added some mud to her... She looks a little too clean! :) I still might...

Here is what I used for this layout..
- Little Miss Sunshine Digital kit by Megan Turnidge from the Scrap Orchard
- Pretty Paper, Pretty Ribbons' Rainy Day Critters Cutting Files
- Happy Lashes Face Assortment face stamps from Peachy Keen
- 1" epoxy sticker (to layer over embellishment)
- Colorbox Fluid Chalk Ink
- regular chalk
- adhesive pearls

I hope you like this layout, and if you are interested in how I create my layouts using digital elements, I have a tutorial HERE!! 

I also have a winner to announce from the Little Prince Blog Hop!! Random.org choose...

Carmen L who said... 

"Hi Candace!! Your little batman is so cute!! Thanks for the chance at the kit. I'm a follower and I already like Madge on FB!


Carmen L"

Carmen, please contact me and I can get you your prize!!!! 

Congrats and thanks so much for hopping with us!!! 


Have a great Sunday!! 

Tuesday, April 2, 2013

Bunny Love - Hybrid Layout Tutorial


My favourite thing about crafting for Easter is all the pastel colors. I fell totally in love with the light version of the new Speckled Egg kit. It matched PERFECTLY with some recent pictures I took of my baby girl. I thought I would share with you all, my process of putting together a layout using digital elements.
Hybrid easter layout2

What I used to create my layout:
How I put my layout together:  
Step 1: Design layout in Silhouette Studio, arranging elements and digital paper. (Using rectangles the same sizes as pictures you will add helps to figure out how large to make elements, etc.)

Silhoutte 01

Step 2: Some elements will be printed out on the base sheet of cardstock and some will be printed, cut and layered on the page. Move all elements you wish to layer off to the side of your mat, leaving the ones that you wish to print on your base paper, then send to printer
Silhoutte 02

Step 3: Move base elements off to the side of the mat and arrange elements you wish to print/cut on your mat. Send to printer, then to Silhouette to cut.  
Silhoutte 03

Step 4: Lay all printed elements out on base layer to get an idea of where embellishments (ribbon, pearls, buttons, etc.) can be added.
Step 5: Add glossy accents to add some texture to elements and let them dry completely (I added glossy accents to confetti on base paper and bow on Easter basket)
Step 6: Start adhering elements starting with what will be underneath pictures (patterned circles, wood border, etc), followed by flower trim
Hybrid easter layout1

Step 7: Add pictures, then elements with foam stickers to give dimension (easter basket, ‘LOVE’ push buttons). 
Hybrid easter layout3

Step 8: Finishing touches (pearls, twine, buttons, etc.) can be added.
I encourage you to give hybrid a try. Even if you don’t have a Silhouette or other cutting machine,  you could design your page in Photoshop and hand cut some key elements to add depth and dimension. It’s a fun way to incorporate some of your traditional scrapbooking supplies.

Monday, April 1, 2013

Craftin' Desert Diva's Guest Designer - Picture Perfect

FOR THE LITTLE PRINCE BLOG HOP - CLICK HERE

Hi!! Today I am a guest designer over at Craftin' Desert Diva's Linky Party!! If you haven't checked out Tara's Linky Parties, you MUST! :) There are TONS of great projects to gain inspiration from and awesome prizes!! 

The theme of this Linky Party is "Anything Goes - With a Button". So easy!! I use a button in almost every one of my projects!!

I decided to make a layout for my daughter's scrapbook using the Recollections stack, Fabulous Me. This stack is the same patterns as the 6x6 pad by My Mind's Eye, but in a 12x12 stack. LOVE! :) 


I cut my title and the white flowered scalloped frame out using my Cameo and a My Creative Time doily die for the doily under my little camera. Everything else was cut by hand. 


My little camera was paper pieced using a stamp from the Instantly stamp set from Pink By Design. My pink hemp twine is from Liz's Paperloft Boutique. 

Now make sure to link up your projects using buttons over at Craftin' Desert Diva's!!