Thursday, February 27, 2014

Doodlebug Tulips

Hey everyone!! I don't know about you, but I have Spring FEVER! I cannot wait until spring arrives... The other day I was thinking to myself that it might lift some of the "winter blues" if I had some fresh spring flowers in my kitchen. The I realized that what would life my spirits even more, was glittery spring flowers. Cue Doodlebug sugar coated cardstock...


I picked up some small, cheap clay pots from Michaels and used regular acrylic paint to give them some great color.


The great thing about this project is that it is super easy to let your little ones help out! My girls actually painted these for me while I worked on cutting the tulips!

Next I added a chunk of floral foam in the bottom of each pot to hold the flower then added a strip of washi tape around the top of the pot. On top of the washi I wrapped twine around the pot (adhered the ends with a small dab of hot glue) and added a bow and a pretty Doodlebug button over top.


Using my Silhouette Cameo and a tulip cutting file from SVG Cutting Files, I cut out three tulips from three colors of sugar coated cardstock. (NOTE: In order to cut through the cardstock I had to make sure I had 'Glitter Paper' selected and set my blade depth to 4)

To keep my tulips from looking 'flat' I adhered the layers together using foam stickers.


Using a glue gun I added a "stem - green pixie - to the tulip. The foam in the bottom of the pots works great to poke the pixie into and keeps the flowers upright.

Shredded green paper worked great as 'grass' and covered up the foam perfectly! My final touch was one of my favorite Doodlepops - a glittery little blue bird.


I hope you enjoyed this little taste of spring - Doodlebug style!!


Tuesday, February 25, 2014

Candace's Birthday Blog Hop!!

Hello, How you Bean?! Welcome to Candace's Birthday Blog Hop!

Today we are celebrating our dear friend Candace's birthday! Candace - I hope you have an amazing day!!!!! You deserve it!!! 
This hop is sponsored by SVG Cutting Files and Jaded Blossom!
Now if you are here from Mel's Blog then you're in the right place, if not then you may want to start in the beginning. If you get lost I have the entire line up below this post.
Here is what I created...

Candace is only older than me by a few months, but she's still older than me!!! :) 
I embossed my sentiment using white embossing powder. 


Candace is a cat lover so I knew I wanted to incorporate a kitty into her card... 


Here is what I used to make Candace's card...
- Totally Grape and Totally Limeade Trendy Twine
- Peachy Keen Happy Lashes Face Stamps
- Halloween Parade 6x6 from Doodlebug Design
- Doodlebug sprinkles & Washi Tape
- sequins
Birthday Hop Prizes
What's a party without some goodies??

In order to enter to win our goodies, please make sure to do the following:
1- Follow every blog on this hop
2- Comment on each stop of this hop
3- Like the Jaded Blossoms Fan Page
4-Like the SVG Cutting File Fan Page
Next up on the Hop.....
BARB!!!
Here is the complete line up
Michelle -www.scrappinwithmybug.com 
Annie -www.creatinganniething.blogspot.com 
Jeanne -www.jeannespapercrafts.com 
ABby -www.scrapbookaholicbyabby.com 
Jamie -http://jamiek711designs.blogspot.com/ 
Mel -http://doxiemeldesigns.blogspot.com/ 
 Candace -www.scrappin2littleprincesses.blogspot.com  (You are HERE)
Barb -www.BugBites411.blogspot.com  (NEXT)
GiGi -http://thecricutbug.blogspot.com/ 
 Jaymie -www.thisandthatscraps.com 
 Crystal -http://crystalscreativecorner.blogspot.com/ 
Stefani -http://stylesbystefani.blogspot.com/ 
Trixie -www.pinkglitterstudio.blogspot.com 
 Katie W & Katie M -www.2craftykaties.blogspot.com 
Kate - www.scrapperscreativecorner.blogspot.com 
Annie -www.svgcuttingfiles.blogspot.com 
 last but not least, the Birthday Girl herself, Candace - www.papercraftsbycandace.com

Saturday, February 22, 2014

Oh the Places You Will Go...

Who loves Dr. Seuss??!! More like, who doesn't love Dr. Seuss??? :) 
We are celebrating Dr. Seuss' birthday in March by sharing a lot of awesome Seuss cutting files and projects we made with them!! 

Here is what I made using some pictures from our visit to Seussland in Universal Studios, Florida a year and a half ago...


The Take Note Collection from Doodlebug screamed Dr. Seuss to me!! Love all the bright, fun colors in it! 


 These files are being given away for free in the SVG Cutting Files Galleria Facebook Group so make sure to head on over there and join!! There are always awesome projects and inspiration being posted over there!! 

Friday, February 21, 2014

Printing Digital Pocket Scrapbook Cards

Hey everyone!!! So I'm not sure if I have mentioned it here on my blog yet, but I have recently caught the PL (Project Life) bug!! (Also referred to as Pocket Scrapbooking...) I just found I wanted to create a scrapbook layout for every single little thing my kids did and it was so overwhelming! I got into Project Life so that I could document all the awesome things we do, and things my kids say, on a daily basis that would be almost impossible to do in a regular scrapbook. 

I was searching for a bedtime digital kit that would work in my PL album and Miss Mint, from Peppermint Creative, offered to let me play with the kit if I would share my creation! Win, win!! :) 

Before I share my page, I just wanted to let you know that printing digital cards from kits from Peppermint Creative is SO easy!!! I really couldn't believe it, so I put together a tutorial on how to easily print out these cards in Photoshop!! The tutorial will be at the end of this post... 

Here is a sneak peek at the AWESOME Good Night Sleep Tight Edition... 


Here is the page I came up with...


I love that this kit is so versatile that I could even use it for a page where my kids SHOULD have been in bed, but were not... 


Here is my tutorial!! 


Supplies:
- White cardstock
- Printer (this tutorial uses a wide format printer but this can easily done using any regular printer!)
- Photoshop Elements
- LIP digital kit

1. Open up Blank File in Photoshop… File, New, Blank File


2. Set size of Blank File to 12x12 inches…
    a. ‘Preset’ should be set to ‘Custom’
    b. Widths should be set in ‘Inches’ in pull down menus
    c. Resolution should be 300 DPI


3. Open up any digital ‘cards’ you would like to print
    a. TIP: Multiple cards can be selected and opened by holding down the CTRL key and clicking on the files


4. Drag and drop cards onto 12x12 file


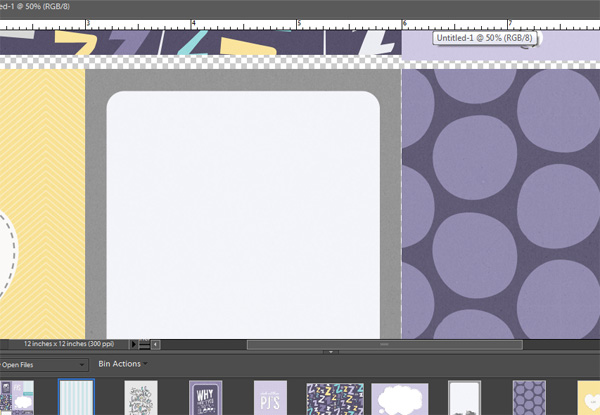
TIP: Make sure none of the open files are maximized, or you won’t be able to drag and drop files (cards). If files ARE maximized, click on the ‘Restore’ button. You should be able to see multiple cards as well as the 12x12 file at the same time.


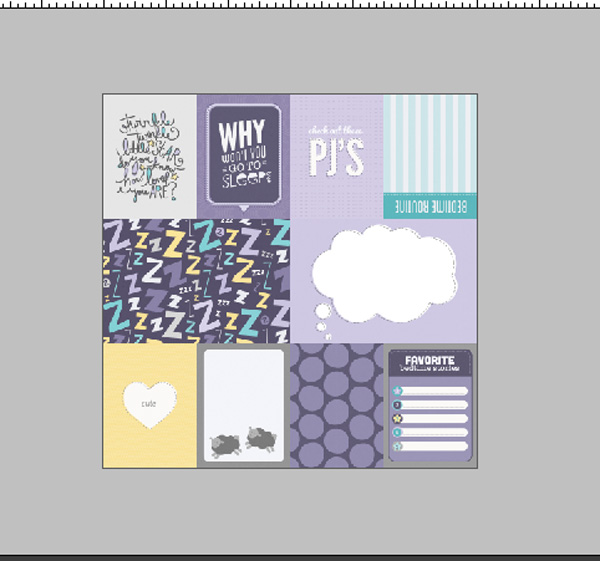
5. As you drag and drop the cards onto the 12x12 file, arrange them like a puzzle with no spaces in between
   a. TIP: The easiest way to do this is start with a card in the corner and line the rest of the cards up.              Zooming in on the cards also helps to line the cards up perfectly. 


6. Since the cards are typically all 4” on one side, it’s easy to arrange them in three rows by rotating them if needed.
   a. TIP: Rotate the cards BEFORE you drag and drop them onto the 12x12 file


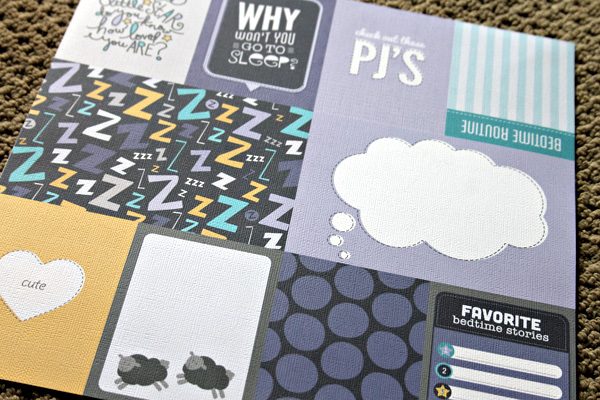
7. Once all the cards are arranged, send to printer


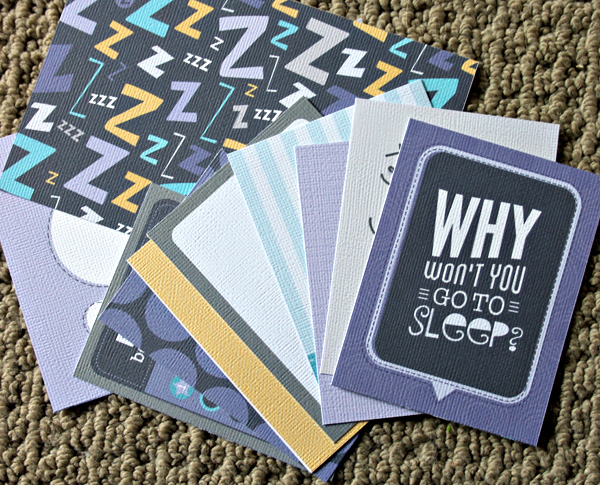
8. Cut the cards using a paper trimmer


Easy peasy, lemon squeezey!! I promise you, these digital PL cards are so addicting!! 

Thanks for stopping by today!! 

Tuesday, February 18, 2014

Paper Smooches Mini Card Set

Hey friends!! I hope you all had a great weekend!! WE did! My husband had his first days off since Jan 2nd so even though this kids were still feeling a bit under the weather, we tried to make the best of it and do some fun activities!! 

Bria went skiing for the first time on Friday with her Kindergarten class so we decided to go again and let Brittyn try it out.


I'm not a big fan of winter - especially when I am stuck in the house a lot with little ones - so it's really exciting that the kids are starting to take up some winter sports like hockey and skiing to get ourselves out of the house!! 

Onto why you are probably really here.... My project for today!! :) 

I recently purchased a few sets of Paper Smooches stamps because they looked super fun to color. I have been loving them!!  


I wanted to make a little set of fun cards so I used some little mini stitched cards by Doodlebug Design.


I love this cute little hampster!!! I used some star dies from My Creative Time, Pebbles washi tape and sequins.


Does he look like he's in a hurry to 'shell-ebrate'?! 


I don't know what possessed me to color my cat purple, but doesn't she look GLAM?? I knew my little girls would love this..

I am entering these cards over at the Paper Smooches Challenge blog!! 


Monday, February 17, 2014

Baby Blues

Happy Monday!! 

So lately I have realized that I am sooo busy working on projects and keeping up with life in general that my posts have become rather... boring... I'd like to get back to more personal posts so I'm going to work at that! Hopefully you will all find my blog a more interesting place to visit!! :) 

Today I have a layout I am soo excited to share!! I have been wanting to make a layout using the hearts from the Jaded Blossom Valentine Dies since the moment I saw them!! I recently received a very lovely, LARGE box of goodies from Pebbles Inc and one of the collections in the box was the Americana Collection. I have been saving these pics of my baby since last summer and I knew they would match the new collection perfectly! 


I love how this turned out and I feel like I can use these dies on almost every project! 


The smaller heart dies make awesome little accents on a bigger project, such as a layout. They would look super cute covered in glossy accents or with a chunky/coarse glitter!! 


I added some of the smaller hearts sporadically around my layout using pop dots to make them stand out. 


Here are the supplies I used to make my layout...
- Americana Collection from Pebbles Inc
- Queen & Co. Washi Tape
- Sequins from Neat *Happy Monday, Jaded Blossom fans!! Candace here from Scrappin' 2 Little Princesses. Today I have a layout I am soo excited to share!! I have been wanting to make a layout using the hearts from the Valentine Dies since the moment I saw them!! 


I love how this turned out and I feel like I can use these dies on almost every project! 


The smaller heart dies make awesome little accents on a bigger project, such as a layout. They would look super cute covered in glossy accents or with a chunky/coarse glitter!! 


I added some of the smaller hearts sporadically around my layout using pop dots to make them stand out. I am so love with the stitching on the larger hearts.... 


Here are the supplies I used to make my layout...
- Americana Collection from Pebbles Inc
- Queen & Co. Washi Tape
- sequins from Neat & Tangled

I hope you were inspired by my use of these awesome Jaded Blossom dies today!!! Thanks so much for stopping by!! 

Sunday, February 16, 2014

You Pull My Heartstrings

Today I am here to share a double layout using some of my fav Pebbles products that I am super excited about. The Yours Truly line has been one of my favorite collections and I cannot stop playing with all the paper and fun embellishments!


As soon as I saw this paper and the color scheme I knew that I had to create a layout with some pictures I took of my daughter. I am so happy this collection has a splash of blue in it – I get a little tired of using only traditional holiday colors!


I am so in love with the chunky glitter on these gorgeous Thickers! I almost couldn’t even use them they are so pretty!!


I always love to journal on my layouts and the mini envelopes and a card from the phrase card pad made the perfect little place to write a note to my daughter.


Another phrase card and some pretty rhinestones flower centers were the perfect touch on the second page of my spread.


The Yours Truly Collection is so great for projects for Valentine’s Day as well as other occasions! I can see myself using it all year round!

Supplies:
Pebbles Yours Truly Phrase Cards
Pebbles Yours Truly Mini Envelopes
American Crafts Knock Out Heart Punch
Pebbles Yours Truly Water Mark Rub ons
Pebbles Yours Truly Chips
Pebbles Heart stickers
Pebbles Yours Truly Patterned Paper: Love Note, Darling, Together
American Crafts Thickers